Table of contents
If you have a passion for visual storytelling, then this Storyboarding for Beginners guide is a must-read. It is a comprehensive step-by-step process, where you will learn how to create a storyboard that will make you proud.
What is storyboarding?

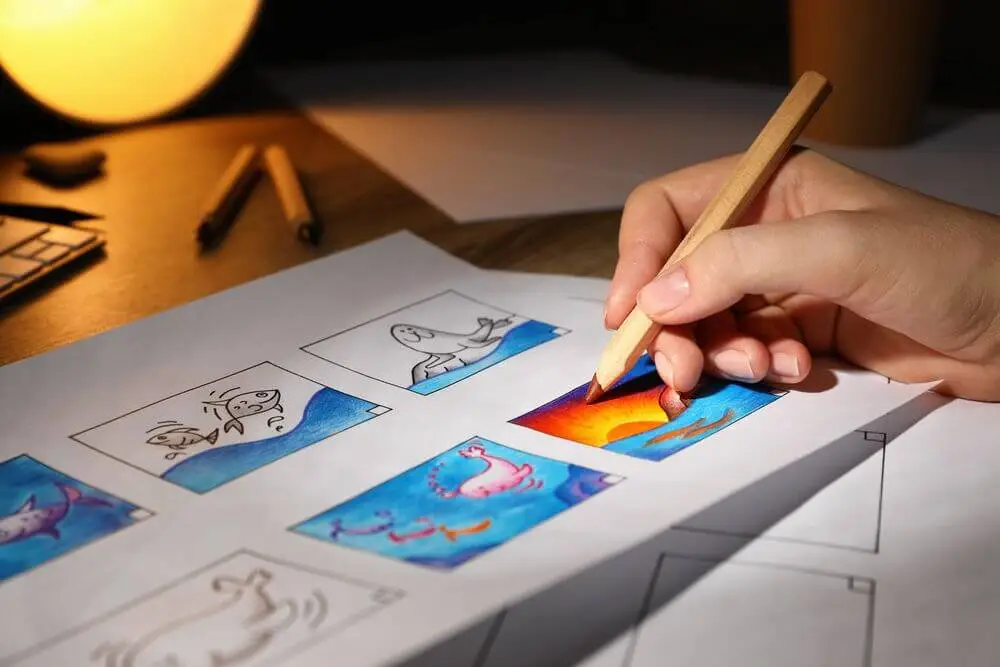
Storyboarding is a way of planning and organizing a story visually before it is brought to life. It involves creating a series of drawings or sketches that show the key scenes, characters, and actions of the story. It can be thought of as a comic strip that helps to outline the flow and sequence of a story. People use storyboarding in filmmaking, animation, video games, video production, and ads.
Elements of Storyboarding

Frames: Frames are like small boxes where you draw or put your pictures. Each frame shows a different part of the story. Make sure you have enough frames to show all the important moments.

Images or Sketches: Inside each frame, you draw or put pictures that show what happens in the story. These can be simple drawings that represent the characters, objects, and places. They help everyone understand how the final project will look.

Shot Descriptions: Next to each frame, you write a short description of what the shot should look like. This helps explain the camera angle, movement, and important details. It guides the team in capturing the shot correctly.

Dialogue or Action Notes: Sometimes, you write words in the frames to show what the characters say or do. These notes give instructions for character movements, facial expressions, or important lines of dialogue.
Annotations: Annotations are extra notes or arrows that you add to the frames. They explain more details or give instructions. They can show camera positions, transitions between shots, or anything important to highlight.
Sequence and Order: Storyboards are put in order, like a storybook. The frames follow the flow of the story in a logical way. This helps the story make sense and keeps it interesting.
Timing and Pacing: Storyboards can also show the timing and speed of the story. You can add notes or numbers to the frames to show how long each shot or scene should be. This helps give an idea of the story’s pace.
Types of Storyboards
There are different types of storyboards that can be used for different projects. Here are a few common types:

Thumbnail Storyboards: These are quick, simple sketches that show the main parts of each scene. They’re used in the early planning stages to explore different ideas and compositions.

Linear Storyboards: Linear storyboards follow the order of the story, showing how each scene connects to the next. They help create a clear and smooth flow of the story.

Vertical Storyboards: These kinds of storyboards are arranged up and down and are good for stories with things like tall buildings or waterfalls. They help show movement and height in the story.

Horizontal Storyboards: Horizontal storyboards are arranged left to right and work well for stories with wide landscapes or horizontal movements. They show the story’s horizontal elements better.

Digital Storyboards: These are made using computer software or digital tools. They give more options for adding images, text, or even motion and sound effects. Digital storyboards are easy to collaborate on and share.
Animatic Storyboards: These combine pictures with audio elements like dialogue, sound effects, or music. They help show the timing and pace of the story, like a simplified version of the final project. Animatics are useful for planning animated or motion-based projects.
How to Create a Storyboard
You may be wondering whether you need to have super drawing skills in order to create a good storyboard. Well, not necessarily. While artistic talent can certainly enhance the visual appeal of your storyboard, the primary goal of storyboarding is to communicate and plan the sequence of a story effectively.
Even with the use of stick figures and sketches, your plan can be communicated easily to your teammates. So, with that said, let’s proceed with this simplified how-to guide to help you learn storyboarding.
Step 1: Define Your Story
The first step in creating a storyboard is to figure out what your story is all about. You need to understand the main idea, what happens in the story, and the important things you want to show in your storyboard.
To define your story, think about these things:
-
Plot and Structure: Decide on the main theme or message of your story. Plan out the important events, problems, and solutions that will happen. Think about how the story will flow and any exciting surprises or changes that will make it interesting.
Example: Imagine you’re making a game about saving a polluted river. Your story could be about a young hero who goes on an adventure to clean up the river. They will face challenges and learn important lessons along the way.
-
Characters: Create the characters who will be in your story. Think about their roles, personalities, and why they are important. Imagine how they will interact with each other and how they will affect the story.
Example: In the game about the polluted river, you might have a brave main character, a wise mentor who helps them, and bad guys who are causing the pollution.
-
Setting and Atmosphere: Imagine where your story takes place. It could be in a futuristic city, a magical forest, or a different time period. Think about the mood and feelings you want people to have when they play or read your story.
Example: In the game, the story could happen in a beautiful natural environment that has been ruined by pollution. You want people to feel the importance of fixing the damage and making the place healthy again.
-
Objectives and Themes: Decide what the players or readers should try to achieve in your interactive content. Think about the important messages or lessons you want to teach them.
Example: In the game, the objective is to clean up the polluted river by completing tasks and solving puzzles. The game will teach players about taking care of the environment, working together, and how individual actions can make a difference.
Step 2. Divide the Story into Scenes
Start by breaking the story into different parts called scenes. Think of scenes like puzzle pieces that fit together to create the whole story. Each scene represents a specific time and place where important events happen. Identify the key moments and actions that take place in each scene. This helps you organise the story and understand how it unfolds. When you divide the story into scenes, you can focus on the important events and make sure they are captured in your storyboard. It’s like putting the story into smaller chunks, making it easier to plan and visualise.
Step 3: Create a Rough Sketch
Once you have your story planned out, it’s time to make a rough sketch of what your interactive content will look like. This means creating simple drawings that show the important scenes and actions in your story.
To create a rough sketch, follow these steps:
-
Get the Basic Layout: Start by drawing a basic layout of the scenes in your story. Think about the different places and situations that are important to show. You don’t need to worry about making it perfect yet, just focus on getting the main idea across.
Example: In our game about saving the polluted river, you might draw the first scene where the main character sees the polluted river for the first time. You can show the river, some garbage, and maybe the character’s surprised expression.
-
Use Simple Shapes and Stick Figures: Don’t worry about drawing fancy or detailed pictures at this stage. Instead, use simple shapes like circles, squares, and triangles to represent objects and characters. You can even use stick figures to show people.
Example: In our game, you can use a rectangle to represent the polluted river, squares for buildings or trees, and stick figures to show the main character and other people.
-
Show the Actions: Think about the important actions or events that happen in each scene. Draw arrows or lines to show how the characters move or interact with objects. This will help you understand the flow of the story and how things should happen.
Example: In our game, you can draw an arrow to show how the main character walks towards the river, and another arrow to show them picking up trash. These arrows help show the actions and how the story progresses.
Remember, the goal of creating a rough sketch is to get a basic idea of how your interactive content will look. It doesn’t have to be perfect or detailed at this stage. The rough sketches will serve as a guide for creating more detailed artwork later on.
Step 4: Add Details
Once you have your rough sketch, it’s time to take it to the next level by adding more details. This step involves enhancing your sketches, deciding on camera angles and shots, and incorporating helpful notes into your storyboard. Here are the important aspects to consider:
-
Refine and Enhance Sketches: Take a closer look at your rough sketches and focus on refining them with more intricate details. This means adding specific features to characters, objects, and the environment. Consider facial expressions, clothing details, and textures to bring your drawings to life.
Example: In our game about the polluted river, you can add more facial expressions to the main character, like showing determination or concern. You can also add texture to the garbage in the river, making it look crumpled or dirty.
-
Decide on the angles of your cameras and the shots: Think about how you want to capture each scene in your storyboard. Choose angles and shots that enhance the storytelling and engage the players. You can also decide on close-ups, wide shots, aspect ratios, camera movement, or unique perspectives to create visual interest.
Example: In our game, you might decide to use a close-up shot of the main character’s face when they make a significant discovery about pollution. Alternatively, you can use a wide shot to show the entire polluted river, emphasizing the scale of the problem.
-
Include Helpful Notes in the Storyboard: Utilize notes in your storyboard to remind yourself and others about important details that may not be easily conveyed through the drawings alone. These notes can cover various elements such as lighting, sound effects, or music choices.
Example: You can add notes in your storyboard to specify that a particular scene should have dramatic lighting to enhance the suspenseful mood. Or you can include a note suggesting the use of water sound effects to create a more realistic experience for the players.
Step 5. Arrange the Frames
Take the frames you’ve drawn and put them in the right order, just like how they happen in the story. This helps create a smooth flow, so the viewer can follow the story easily. Imagine it like a puzzle where you arrange the pieces in the correct order. By organising the frames in the right sequence, you make sure that the story makes sense and that everything happens in the right order. It’s like putting the scenes of a movie in the correct sequence, so it tells the story in a way that makes sense to the audience.
Step 6. Review and Refine
Take a step back and carefully examine your storyboard to make sure it tells the story clearly. Look at each frame and think about whether it effectively communicates what you want to say. Check if the visuals and descriptions are easy to understand and if they capture the right emotions and actions. If you find any areas that need improvement, make changes to the drawings or descriptions to make them clearer and more engaging. This step is important because it helps you make sure your storyboard is the best it can be before moving forward.
Step 7. Share and Collaborate
Once you have created your storyboard, it’s important to share it with the other people working on the project, like directors, designers, or teammates. Sharing your storyboard means letting them see it and getting their feedback. This collaboration helps you work together as a team to make improvements and make sure everyone is on the same page. By listening to their ideas and suggestions, you can make your storyboard even better. Collaboration allows you to combine different perspectives and expertise, leading to a stronger and more effective final project. Remember, teamwork and communication are key to creating a successful storyboard and bringing your story to life.
Storyboarding Tools and Techniques
If you’re new to storyboarding, you might be wondering what tools and techniques you’ll need to get started. In this section, we’ll cover some of the most popular traditional and digital tools, as well as some techniques that can help you create effective storyboards.
Traditional Storyboarding Tools
Traditional storyboarding tools are those that are used on paper or other physical materials. Some of the most common tools include:

Pencils and erasers: These are the basic tools you’ll need to sketch out your storyboard frames. As a storyboard artist, use any type of pencil you prefer, but a soft lead (such as a 2B or 4B) will make it easier to create dark lines and shading. This is the perfect tool when it comes to how to make a storyboard on paper.
Storyboard panels: These are specially designed pads of paper that have pre-printed storyboard frames on each page. They come in a variety of sizes and formats, so you can choose the one that works best for your project.
Post-it notes: If you prefer a more flexible approach, you can use Post-it notes to create your storyboard frames. This allows you to easily rearrange and adjust your frames as you go.
Digital Storyboarding Tools
Digital storyboarding online tools are those that are used on a computer or other digital device. Some of the most popular tools include:
Storyboarding software:
There are a variety of software programs available that are specifically designed for storyboarding. Two of the most popular ones are Boords and “Storyboard That”.
Boords: Boords is a popular online storyboard software that simplifies the process of creating and sharing storyboards. It offers a user-friendly interface and a range of features designed specifically for storyboarding. Here are some key highlights of Boords:
- Easy-to-use Interface: Boords provides a simple and intuitive interface that allows users to quickly create and edit storyboards. Its drag-and-drop functionality makes it easy to arrange scenes and add images or illustrations.
- Collaborative Workflow: Boords supports collaboration by enabling multiple team members to work on the same storyboard simultaneously.
- Export and Sharing Options: Boords allows you to export your storyboard as a storyboarding PDF or as individual image files.
Storyboard That: Storyboard That offers a wide range of customizable characters, props, and scenes, allowing users to create visually appealing storyboards. Here are some key features of Storyboard That:
- Vast Library of Assets: Storyboard That provides a vast library of pre-designed characters, props, and backgrounds that users can easily customize and incorporate into their storyboards.
- Flexible Layouts and Panels: Users have the flexibility to customize the layout of their storyboard frames, adjusting the number of panels per page and their size.
- Text and Speech Bubble Options: Storyboard That offers various text and speech bubble options, allowing users to add dialogue, captions, and descriptions to their frames.
Drawing tablets:

If you prefer to draw your storyboard frames by hand but want to do so digitally, you can use a drawing tablet. These devices allow you to draw directly onto a digital surface using a stylus and often include pressure sensitivity and other advanced features.
Storyboarding Techniques
In addition to the tools you use, there are also some techniques that can help you create effective storyboards. Here are a few to consider:

Thumbnail sketches: Before you start creating your storyboard frames in detail, it can be helpful to create small thumbnail sketches of each shot. This allows you to quickly experiment with different compositions and camera angles before committing to a full drawing.
Shot lists: Creating a shot list can help you stay organized and ensure that you capture all the shots you need for your project. This list should include details such as the shot type (wide, medium, close-up, etc.), camera angle, and any other important information.
Reference images: If you’re struggling to visualize a particular shot, it can be helpful to find reference images online or in books. This can give you a better sense of the composition and lighting you want to achieve.
Overall, there are a variety of tools and techniques you can use to create effective storyboards. Whether you prefer traditional or digital tools, or a combination of both, the most important thing is to find a method that works for you and allows you to bring your creative vision to life.
According to Videomaker, a good storyboard allows you to show your clients or team exactly what you have in mind for a particular scene, and it can help you identify any potential problems before you start shooting. So, investing time in creating a good storyboard can save you time and money in the long run.
Conclusion
Congratulations! You’ve learned the basics of storyboarding. Storyboarding is a valuable tool for aspiring storytellers and creative minds. It helps you bring your ideas to life by planning, visualising, and communicating them effectively before starting the final project. Whether it’s for film production, animation, advertising, or any visual storytelling, storyboarding sets the foundation for success.
In addition, storyboarding teaches you to break down complex stories into manageable scenes, ensuring a smooth flow between frames. With sketches, images, and notes, you can express emotions, actions, and narrative arcs in a clear and captivating way. Understanding the story deeply and applying composition, clarity, and continuity principles brings your storyboard to life.
Using tools like paper and pencil, digital software, or collages, storyboarding becomes accessible and versatile. You can improve your storyboard through feedback and collaboration, continuously refining it to match your vision. Sharing a storyboard template as a PDF enables the creative team to work together seamlessly and understand the project’s direction.
Storyboarding is not just a planning tool; it’s a path to success in visual storytelling. Follow the step-by-step process and embrace principles of clarity, composition, and storytelling techniques to unlock your imagination and captivate audiences with your narratives.


