Table of contents
If you’re looking to create an interactive map for your personal or professional needs, Google My Maps is a great tool to consider. With this free online tool, you can create custom map layers, add markers and icons, and share your map with others. Whether you’re planning a road trip, highlighting points of interest for a project, or simply want to visualize data in a new way, Google My Maps can help.
To get started with Google My Maps, all you need is a Google account. Once you’re signed in, you can create a new map and start adding your own custom content. You can add markers to specific locations, draw lines and shapes to highlight areas, and even add photos and videos to your map. And if you’re working with data, you can import your information directly into Google My Maps to create a visual representation of your findings.
One of the great things about Google My Maps is that it’s easy to use, even if you don’t have any experience with mapping software. The interface is intuitive and user-friendly, and there are plenty of tutorials and resources available to help you get started. So whether you’re a seasoned mapmaker or a beginner, Google My Maps is a great option for creating interactive maps that are both functional and visually appealing.
How to Use Google My Maps to Create a Custom Map
In this section, we will explore the basics of using Google My Maps. Before getting started, prepare the location information which you will input into the map.
1. Create a New Map
Go to the
Google My Maps
website. Login with you Google account.
If this is the first map you have ever created with My Maps, you will be presented with an empty dashboard like the one below. Click on the “Create a new map” button.

2. Give the Map a Name and Description
When the map opens, it will display your current country initially. Give your map a name and description by first clicking on “Untitled Map” on the top-left panel. Click “Save” when you are done.

3. Choose the base map that you want to use.
Base maps serve as the underlying background for your custom map.

The default map is the one that opens when you first clicked on “Create a new Map”. Other Options include:
-
Satellite: This base map displays satellite imagery of the Earth’s surface. It provides a detailed view of the terrain, buildings, and other features.
-
Terrain: The terrain base map shows the physical features of the Earth, such as mountains, valleys, and bodies of water.
-
Light Political: This base map is designed to emphasize political boundaries and features, making it useful for visualizing geopolitical information in a clear and uncluttered manner.
-
Mono City: This has a simplified and abstract design. Its used when you want your map information (which we shall add in a moment) to stand out and be the main focus without distracting labels and default information which appears on other base maps.
-
Simple Atlas: This base map provides a traditional map view with labeled countries, cities, roads, and other geographical features. It is similar to a standard paper map.
-
Light and Dark Landmass: These base map feature a neutral color scheme, which creates a clean and uncluttered visual appearance. They focus on representing landmasses and continents, providing a clear view of the geographic layout.
-
White Water: This is a minimalist base map where all the water bodies are colored white. It shows all major roads, cities and towns as you zoom in.
In this example, we have chosen to use the “Dark Landmass” base map.
4. Create and label layers.
Layers are an important feature of Google My Maps that allow users to organize and manage different sets of data within a single map. You can add multiple layers to a single map, each containing distinct data sets or information. For example, you could have one layer for restaurants, another for landmarks, and another for hiking trails.
Click on “Untitled Layer” to label the first layer. In this example, we shall give it the title of “Museums” because we want to add information about some of the largest museums in the USA to our map.

Click on “Add Layer” to create a new layer if you have the need for it. Remember to label the new layer appropriately.
5. Add Information to the map.
There are two ways you can add information to the map. You can either add information maually or by importing data to the map.
-
The manual approach: Click on the “Add Marker” button and then click on the location where you want to place the marker.
You can also add a title and description to the marker by clicking on it and then clicking on the “Edit” button.
-
Import data to the map. For this map, we have created a spreadsheet (in csv format) of the museums we would like to add to the first layer of the map. Below is what the data looks like.
Click on “Import” to import the data into the map. You will be asked to confirm which of your data should be used as the location information in your file. Google My-maps usually preselects the most likely column for location, which in our case are the logitude and latitude columns. You could use the actual address instead of coordinates for each location.

The next thing you need to do is to select the column which identifies each place (or each museum in on this example). Our column entitled “Name” is good for this.

Click on “Finish” when done.
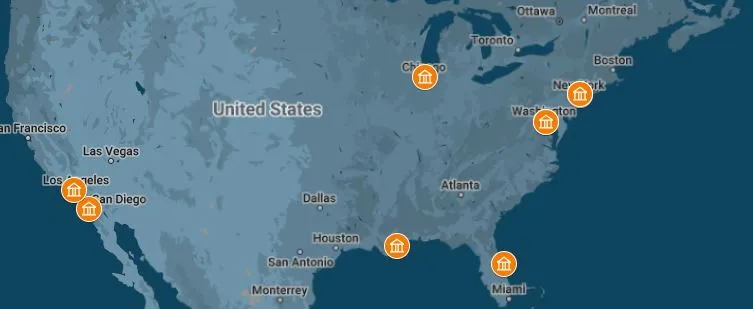
Here is what the museum map looks like at this point.

6. Change the styles if desired.
Initially, in order to change the styles of the markers, you have to go to each marker and click on “style” to change the colors and the icon.

If this is fine by you, go ahead and choose the desired icon as well as the color of your choice for each marker.
If, however, you prefer to change all the icons on the layer in one go:
-
Click on “Individual Styles”
-
Select “Uniform Style” under “Group places By”
-
Click on any of the markers and select a new or more appropriate icon and color.
7. Enhance your locations with images and/or videos.
You can add multimedia to each place by clicking on the marker and selecting the camera icon. Upload the photos or video or use available images and video from google images, drive and YouTube. Remember to click “save” when done.
8. Share or embed your map.
Click on “Share” to get the share-link which you can send within your emails or other social share means.

Or you can now embed the map onto your website. To do this:
-
First make the map public by clicking on “share”, and then allow everyone with the link to be able to view the map.
-
Click on the “Menu” and select “Embed on my site”
-
Choose whether you want map viewers to see your profile picture and name. Copy the code and embed it onto your website.
Conclusion
In conclusion, Google My Maps offers a user-friendly and versatile platform for creating custom interactive maps. Whether for personal or professional use, the tool provides the ability to add custom map layers, markers, and multimedia content. Its accessibility through a Google account makes it convenient to get started, and the platform’s intuitive interface caters to both beginners and experienced mapmakers.
With features such as importing data and various base map options, Google My Maps enables users to create visually appealing and informative maps for a wide range of purposes. Whether planning a trip, visualizing project data, or simply exploring new ways to present information, Google My Maps is a valuable tool for creating engaging and functional maps.
 You can also add a title and description to the marker by clicking on it and then clicking on the “Edit” button.


